What you need to know
Your application should normally be made between 12 months and 90 calendar days before your desired Flexible Service (FS) start-date.
It is important that you have read and understood JSP 750 Flexible working and flexible service (chapter 2) before proceeding.
The number of FS applications you can submit is not limited but you cannot have more than one active FS application running at a time. An application is considered active from the date you submitted the application until a formal decision has been made (plus 14 calendar days if you decide to appeal).
You can withdraw your FS application at any point in the application process until the decision by the Approving Authority.
You need to apply for FS through JPA. If you don't have access to JPA, you should apply through your Unit HR Admin.
What you need to do
Whilst any Regular Service Person has the right to apply for Flexible Service (FS), approvals will not normally be granted in the following circumstances:
- where you have not completed phase 1 and 2 training; plus any additional period of service defined by your owning Service
- when serving under sentence because of disciplinary action
- where you have been warned or are under notice for operations, on sea service or placed at high readiness
- during a period of Terminal leave
- where you have already an FS application under consideration or appeal
Under exceptional circumstances your Commanding Officer (CO) may make a recommendation, with suitable justification to the Approval Authority, where the eligibility criteria have not been met.
Eligibility is not constrained by role and an application for any job can be considered on merits. However, the requirement to maintain operational capability will have a strong influence on the decision. You should not assume that an application will be successful. You should start discussions with your line manager early in the application process.
There are no limits on how many applications you can make during your career but limits will apply to the total time you can serve on FS so that most of your career is in full-time Service. This will also provide fair access to FS for other military personnel.
FS must be for a minimum of 3 months and a maximum of 3 years, or to the end of your current or confirmed future availability date, whichever is sooner. Other forms of leave and/or service are possible outside of these minimum and maximum periods.
If you don't have access to JPA, you should apply through your Unit HR Admin.
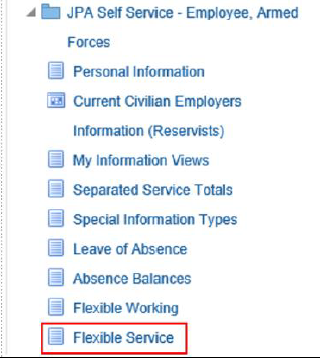
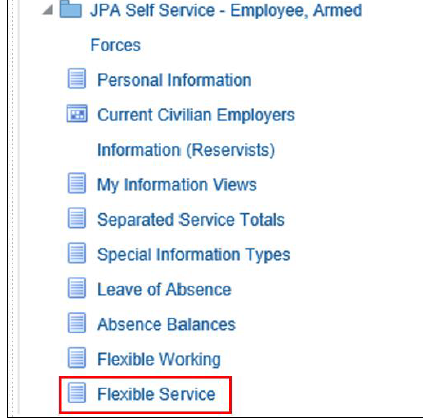
- Logon to JPA and navigate to PA Self Service - Employee, Armed Forces > Flexible Service

- The Flexible Service (FS) screen is displayed. In this example there are no previous FS Applications

- click the Create button to open the FS Application screen
- if there is a partially completed FS Application in progress, select the relevant radio button
- the FS Application screen will appear, as shown below
- if you want to restrict your separation, select the drop-down arrow as shown below, selecting Yes or No:
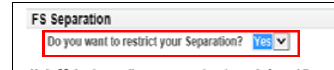
- if Yes, enter your requested Start Date and End Date using the pop-up calendars for the period of restricted separation
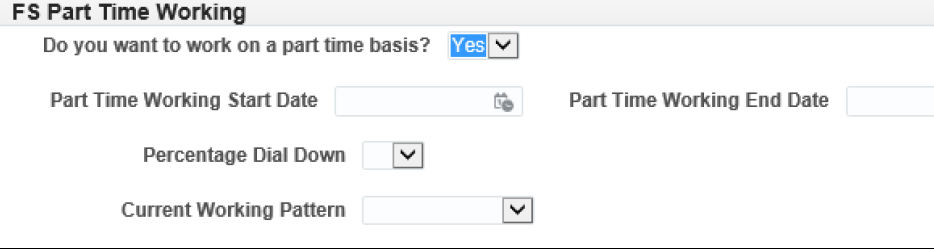
- if you want to apply for Part Time working, select Yes from the drop-down arrow
- the Part Time Working Start Date, Part Time Working End Date, Percentage Dial Down and Current Working Pattern fields will become visible as shown below
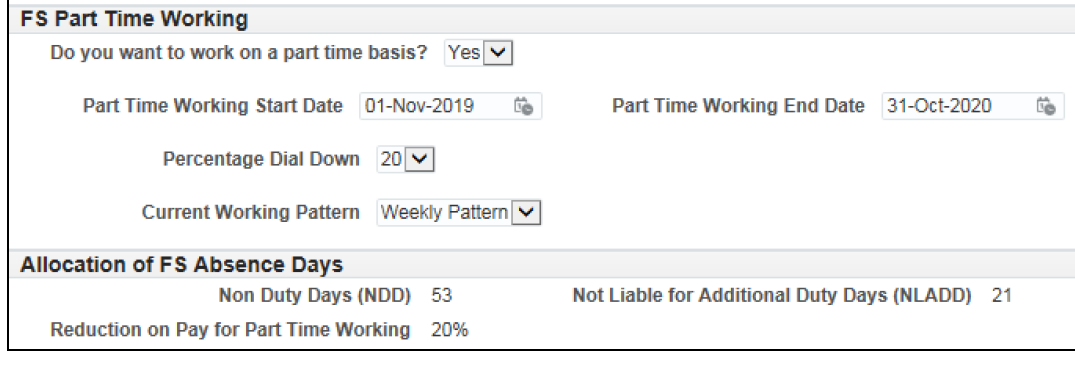
- enter your requested Part Time Working Start Date and Part Time Working End Date using the pop-up calendars
- click the Percentage Dial Down arrow and select your required level, 20% or 40%
- click the Current Working Pattern arrow and select Weekly or Shift Pattern, whichever applies
- click Calculate. This will work out the number of Non-Duty Days (NDDs) and Not Liable for Additional Duty Days (NLADDs) for the part time period, based on the Dates, Percentage Dial Down and Current Working Pattern set

- the following example screen shows that 53 NDDs and 21 NLADDs have resulted from a request for a 20% dial down during the period 1 Nov 19 to 31 Oct 20, based on a Weekly Pattern
- note that in this example, the FS Arrangement covers a leap year day, 29 Feb 20. In a non-leap year 12-month period, there would be 53 NDDs and 20 NLADDs
- note – You can change the dates and recalculate the NDDs and NLADDs as required as the request has not been submitted at this stage
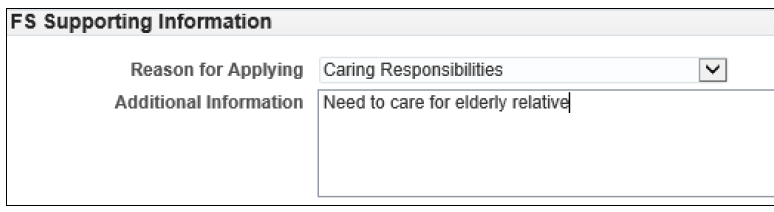
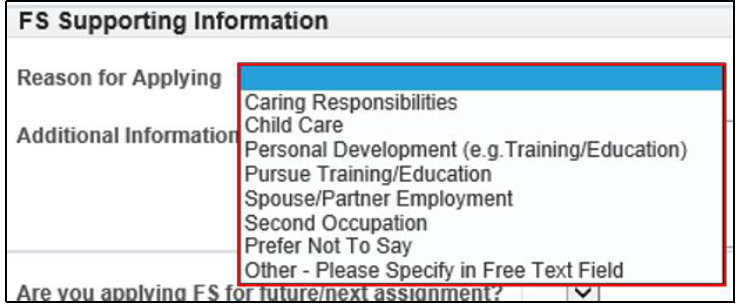
- once ready to proceed, complete the FS Supporting Information. If applying for PTW, details of the proposed working pattern should be included here, for example if you intend to work 4 days a week, taking a NDD every Friday
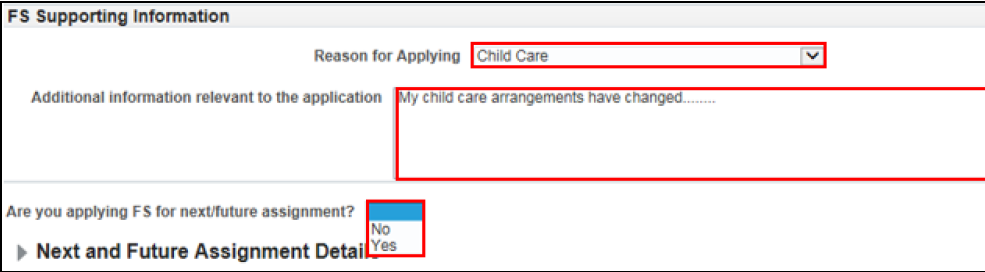
- select the appropriate Reason for Applying from the drop-down list. Any justification or relevant additional information to support the application may be entered in the free text box as shown below
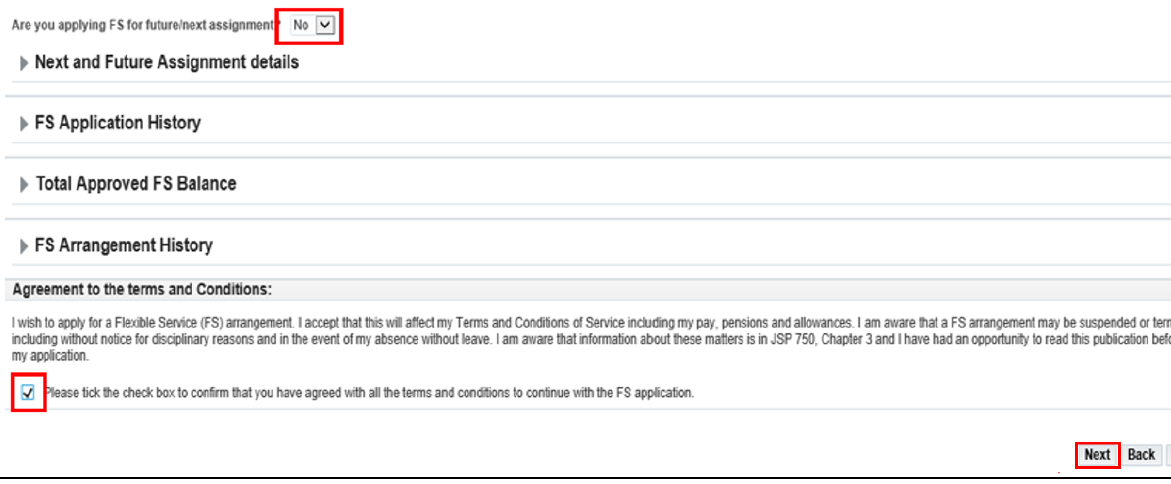
- select Yes or No if applying for a future assignment, as appropriate. Note that details of a future assignment will appear, if the Assignment Order has been issued
- if you are applying for FS for dates that will carry into a future assignment, the application process will involve the COC of the future unit
- in this case the SP has selected No
- tick the check box to agree to the Terms and Conditions as set out in JSP 750 Chapter 3
- click Next to proceed with the application and continue to the review stage
- note: Click Back – to return to the previous screen
- click Save – to save the FS Application and complete it at a later date
- click Cancel – to abort and delete the FS Application
- note that details of all FS Applications, whether approved or rejected, will be populated in the FS Application History, and any approved NDD and NLADD balances will appear in the Total Approved FS Balance section
- assuming Next has been selected, the Review screen will appear
- note: If any of the FS rules have been breached, any applicable warning messages will be displayed at the top of the screen as shown below. However, the request may still be submitted. These warning messages will be retained with the FS Application for all actors in the approval process to see
- note: If any error messages have appeared during the process, for example if invalid dates have been entered, the error(s) must be resolved or the FS Application cannot be progressed
- note: If an FS Application is created but not submitted within 28 days it will be withdrawn and be removed from the Flexible Service Screen
- click Submit, which will send the application for processing to the first actor in the approvals chain, the Unit HR Admin
- a message will confirm this as shown below
- note that in this case, there are 2 warning messages, but the FS Application will still be progressed
The FS Withdrawal process only applies to applications that have not yet been approved by the Approval Board. If the FS application has been approved, a FS Arrangement will have been created. The process for terminating a FS Arrangement is described here.
- logon to JPA and navigate to PA Self Service - Employee, Armed Forces > Flexible Service
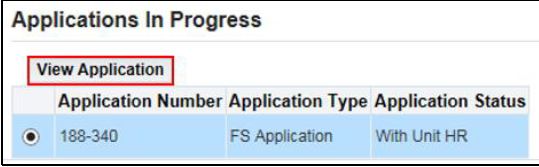
- select the relevant Radio button then View FS

- click the radio button and View Application
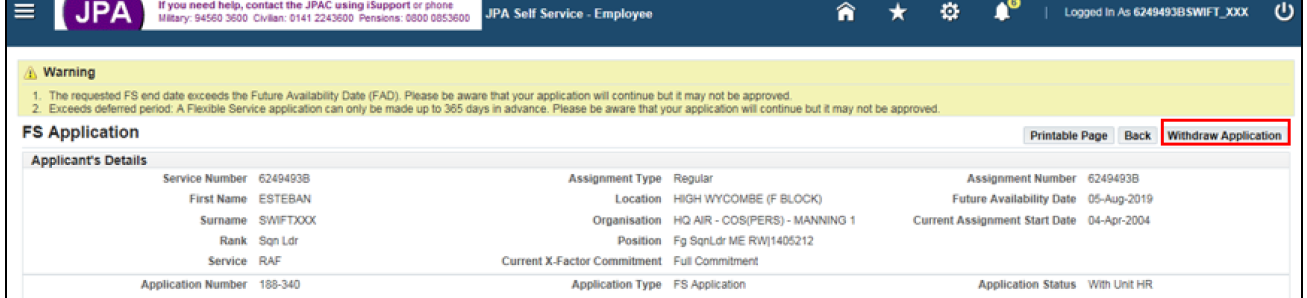
- the FS Application screen will appear
- click Withdraw Application
- the Withdrawal Section will appear
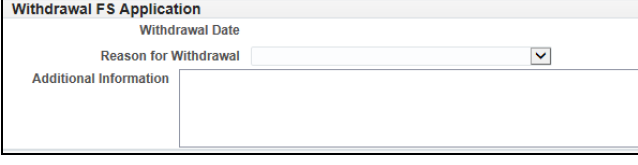
- select Reason for the Withdrawal from the drop-down list
- input any Additional Information as required in the free text box
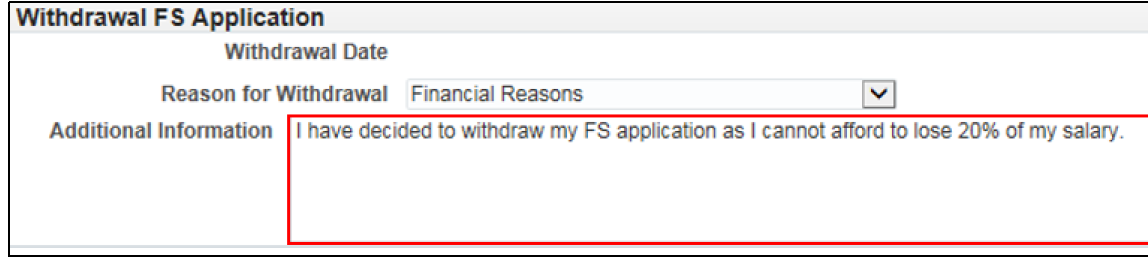
- click Submit. The application will be withdrawn and the following message will be shown

- a Workflow Notification will be sent to all actors in the FS administrative chain that had processed the FS Application up to the point of the withdrawal, informing them that the FS Application has been withdrawn
- logon to JPA and navigate to PA Self Service - Employee, Armed Forces > Flexible Service

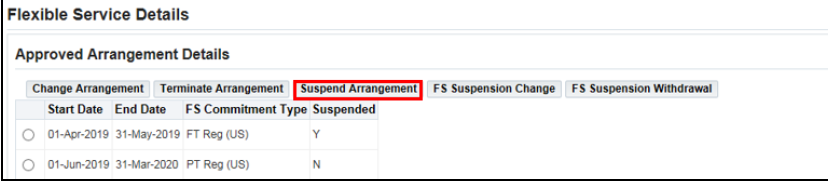
- a screen will open which shows the approved FS Arrangement(s)
- click the radio button for the FS Arrangement you wish to suspend
- click the View FS button in the top right-hand corner of the screen
- the Flexible Service Details page will be displayed:
- click Suspend arrangement
- the FS Suspension page will be displayed. Note the Suspension Details section
- select either Restricted Separation or Part-Time Working (PTW) Suspension and enter the reason from the Suspension Reason drop down list. Note, both Restricted Separation and Part-Time Working (PTW) can be suspended simultaneously
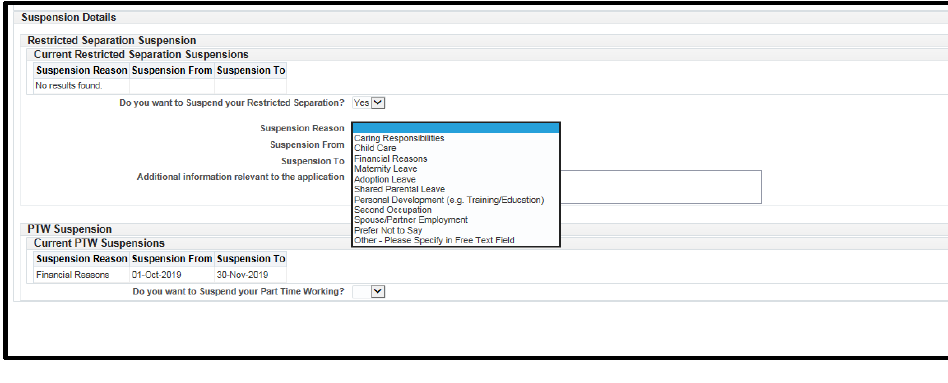
- enter the dates for the suspension in the date fields using the pop-up calendars
- add any additional information in the free text box
- click Next
- click Submit to send the suspension request for processing
- note: Warning messages may appear at the top of the screen. In this example the warning message indicates there has been insufficient notice given; however, this does not prevent you from submitting the form
- a confirmation message will be displayed at the top of the screen once the changes have been applied to the system
- logon to JPA and navigate to PA Self Service - Employee, Armed Forces > Flexible Service

- the Flexible Service screen will open

- click the radio button of the FS Application that is suspended
- click View FS
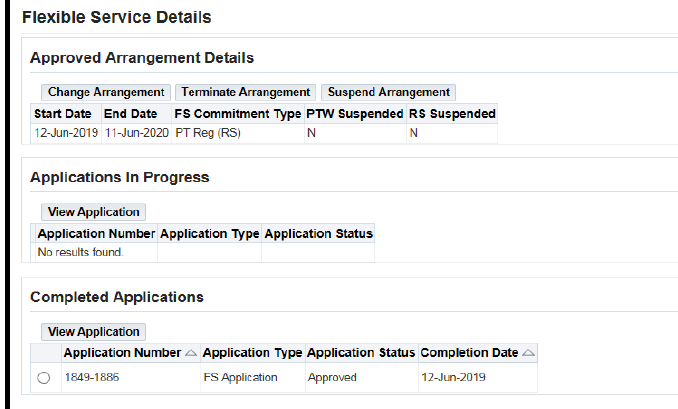
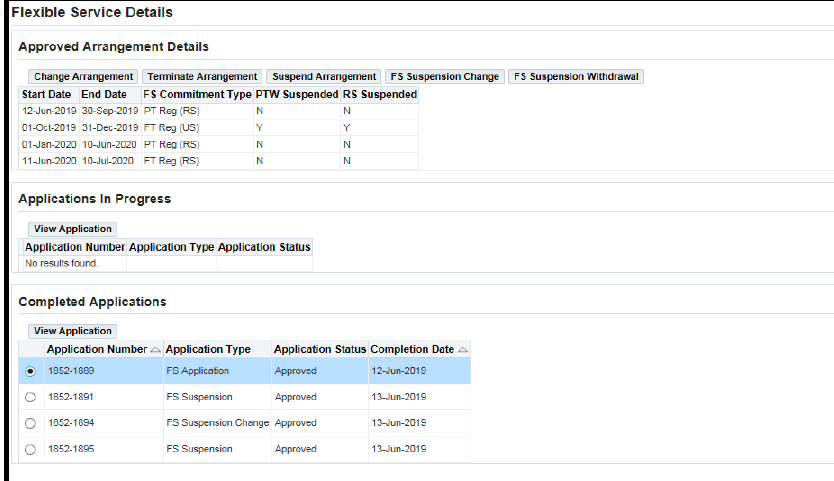
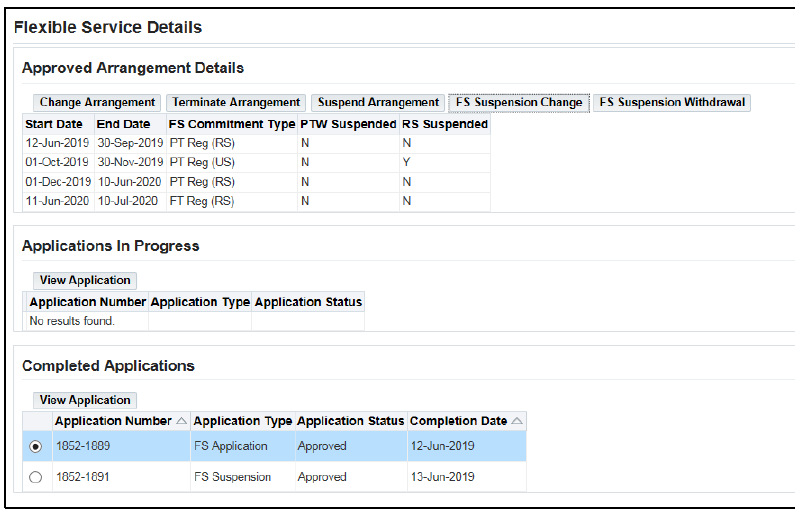
- the Flexible Service Details screen will appear
- note the element of the FS Arrangement (in this case PTW) that is currently suspended is shown in the Approved Arrangement Details section and the Completed Applications section shows the details of the actual FS Suspension application
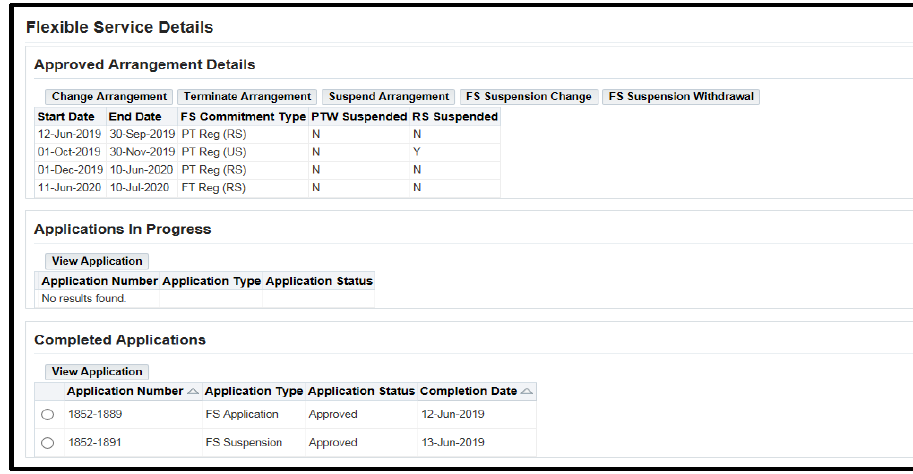
- select the radio button of the Completed Application that is currently suspended and click FS Suspension Withdrawal
- the FS Suspension screen will appear
- note the Withdrawal of Suspension Details section, which must be completed. Select the radio button for either Restricted Separation or PTW and select Add to Withdraw List
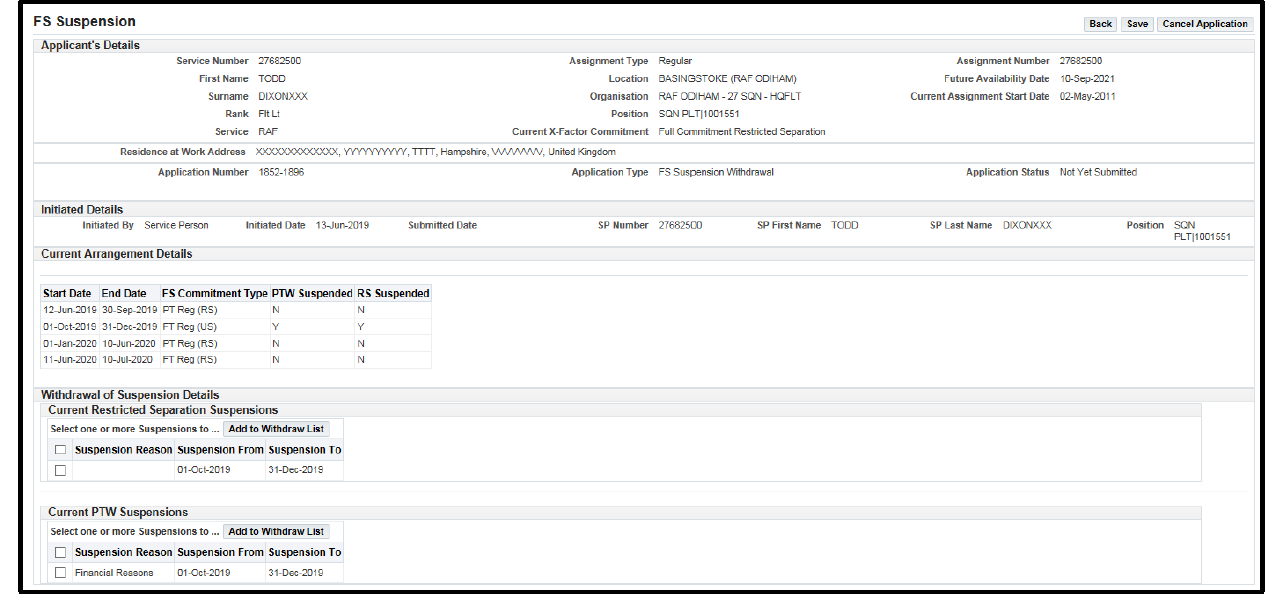
- an additional section will appear as shown below. Populate the relevant fields
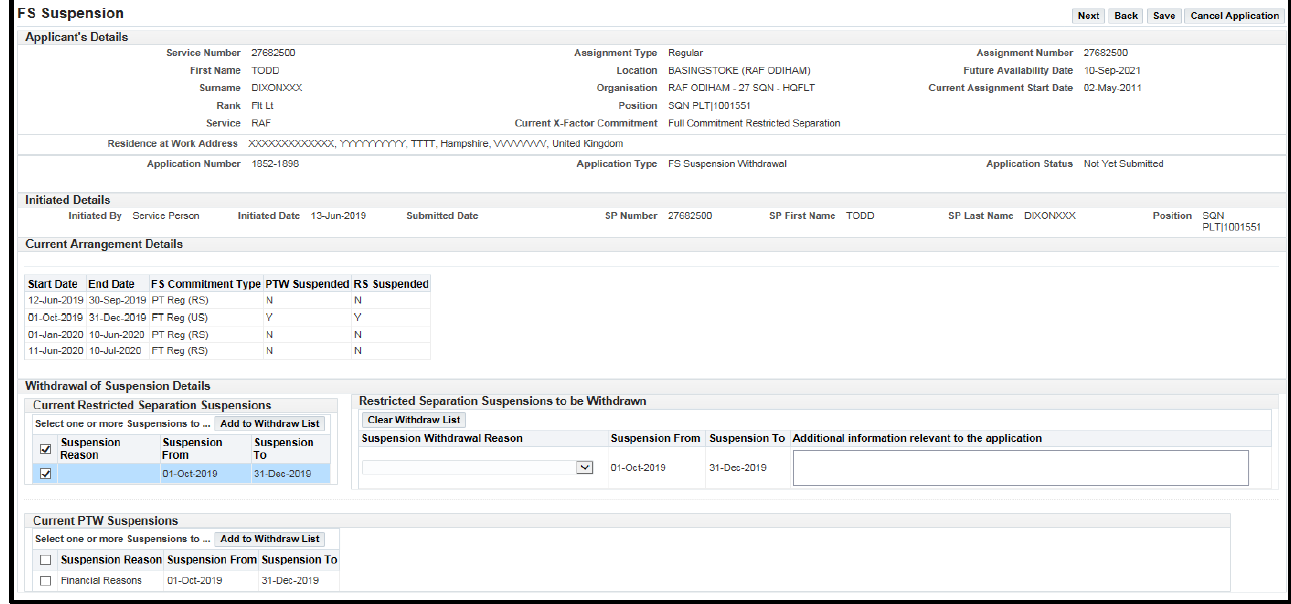
- select from the Suspension Withdrawal Reason drop-down list. Add any additional information relevant to the application in the free text box
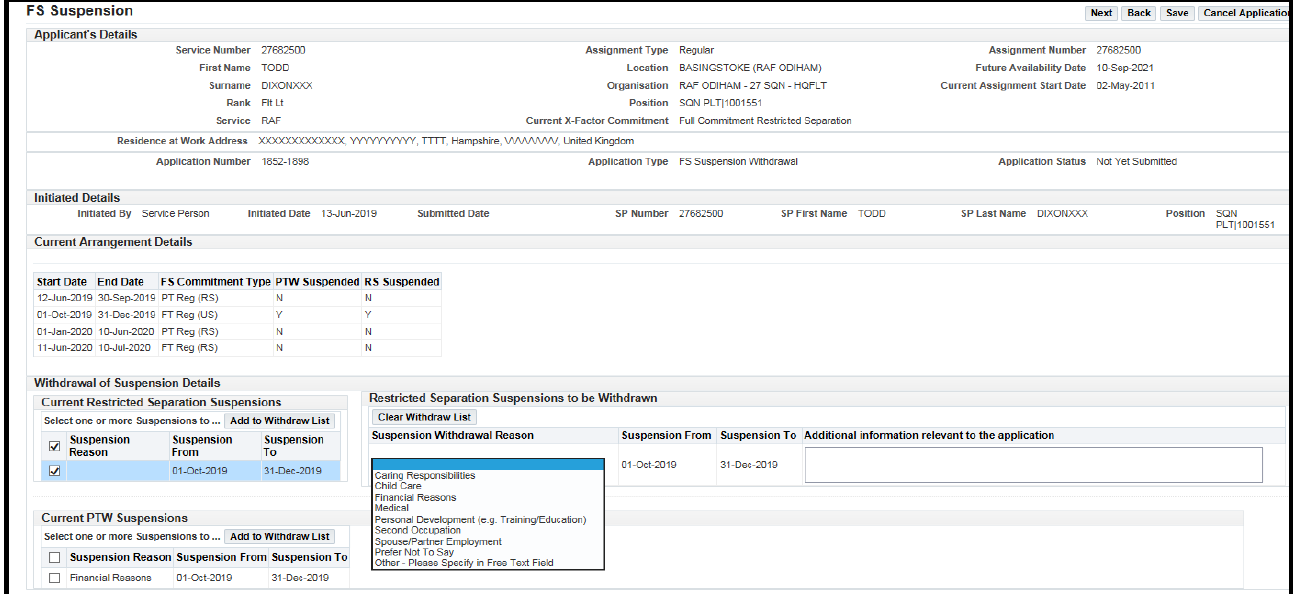
- click Next
- review your application then click Submit
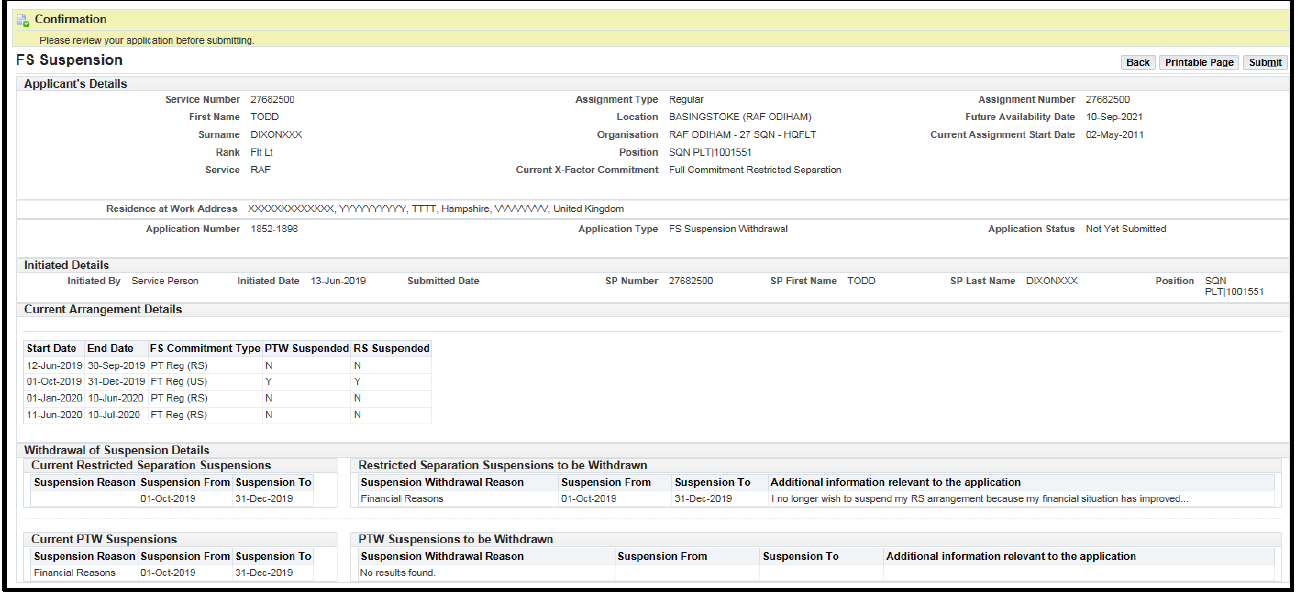
- the application will be submitted to Unit HR and a confirmation message will be displayed
- logon to JPA and navigate to PA Self Service - Employee, Armed Forces > Flexible Service
- the Flexible Service screen will appear

- click the radio button of the approved FS Arrangement that is suspended
- click View FS
- the Flexible Service Details screen will appear
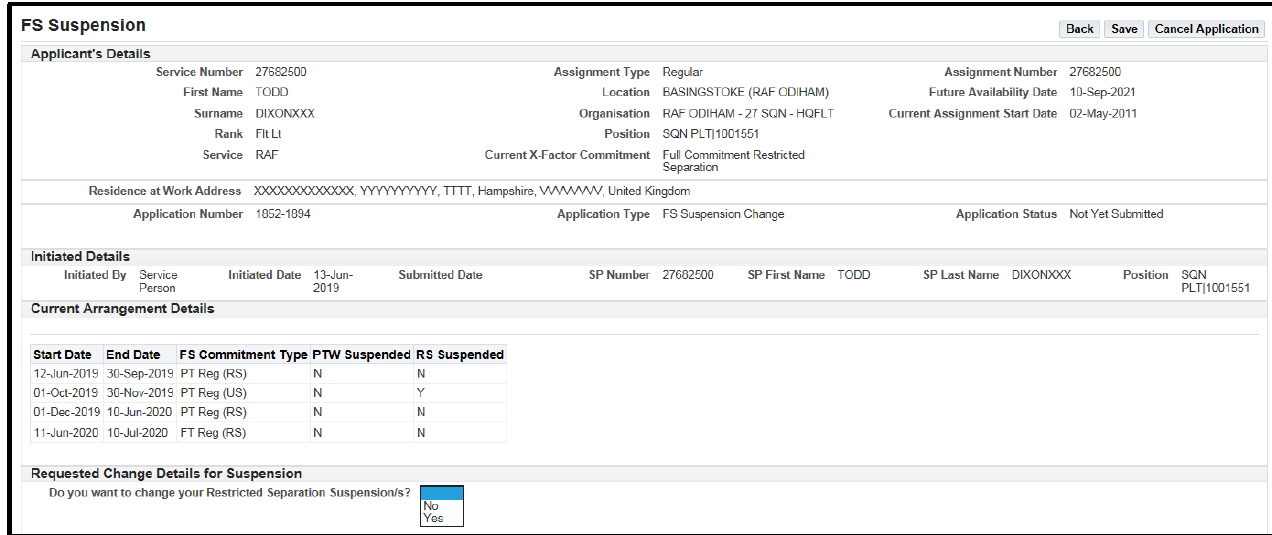
- select the Radio button of the suspended FS Arrangement to be changed
- click the FS Suspension Change Button
- the FS Suspension screen will open
- note the Requested Change Details for Suspension. Select Yes
- the suspension screen opens
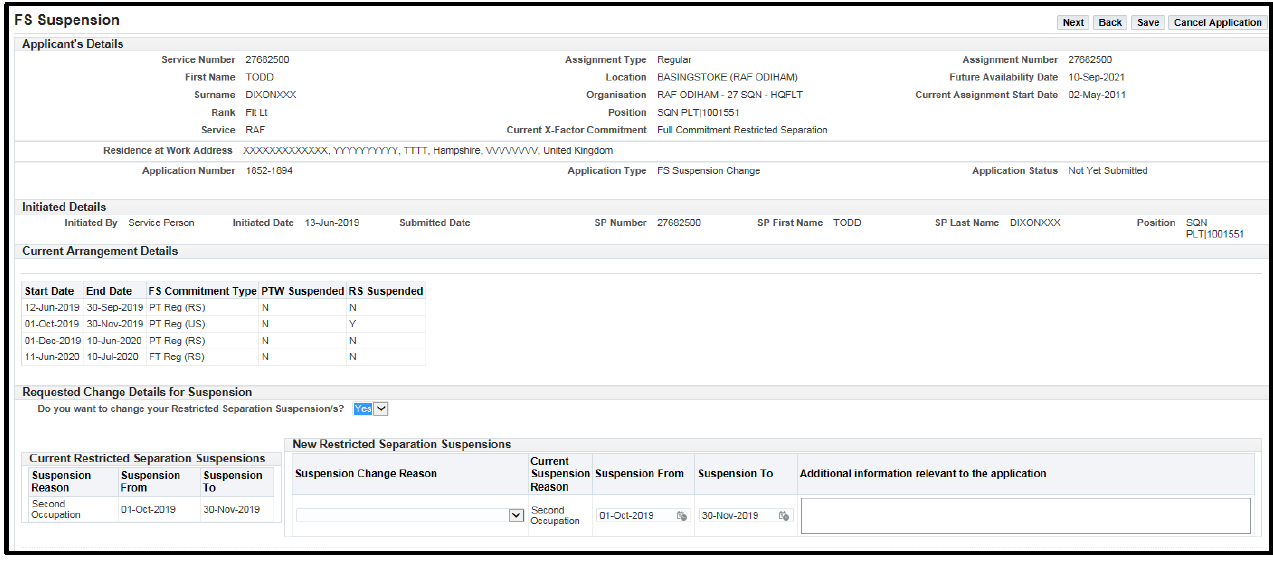
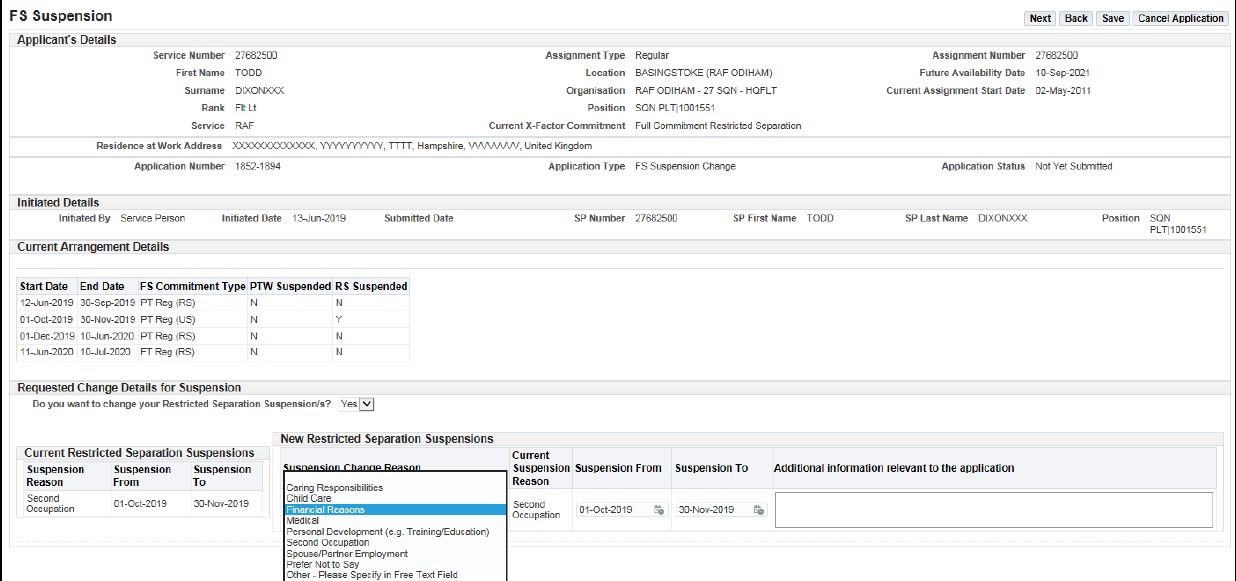
- populate the New Restricted Separation Suspensions section. Note, the dates auto-populated are the dates of the existing suspension – these can be amended using the pop-up calendars. Enter any relevant information in the Additional Information free text box
- select Next
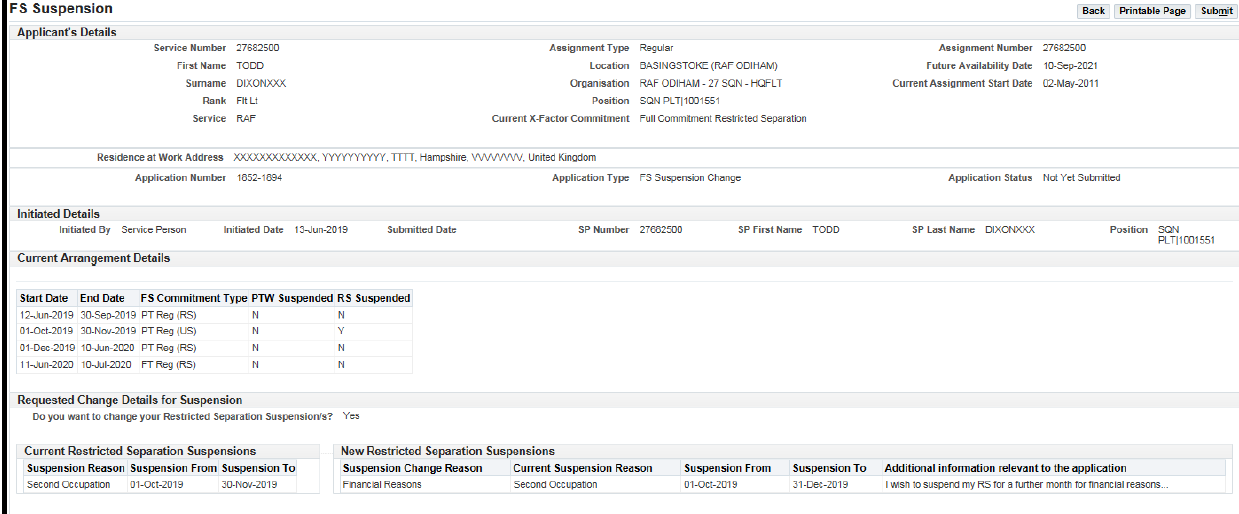
- review the form and once satisfied click the Submit button to send the request for processing. This will invoke a workflow notification to the next actor in your COC, your Unit HR Admin
- you will receive a confirmation message at the top of the screen:

- note: You may get a warning message, as in the above example, if you are requesting a change within the 90-day notice period. However, the application will still be progressed
- click the Submit button
- a message will then show the Suspension Application has been submitted to the next actor in the Chain of Command for processing, the Unit HR Admin
- logon to JPA and navigate to PA Self Service - Employee, Armed Forces > Flexible Service
- the Flexible Service screen will appear

- select the radio button of the Approved FS Arrangement to be changed
- the Flexible Service Details screen will appear
- note that if there is more than one approved FS Arrangement in place, a change cannot run into a future approved FS Arrangement
- select the radio button for the FS Arrangement to be changed and click Change Arrangement

- the FS Change screen will appear. Note the area in the red box
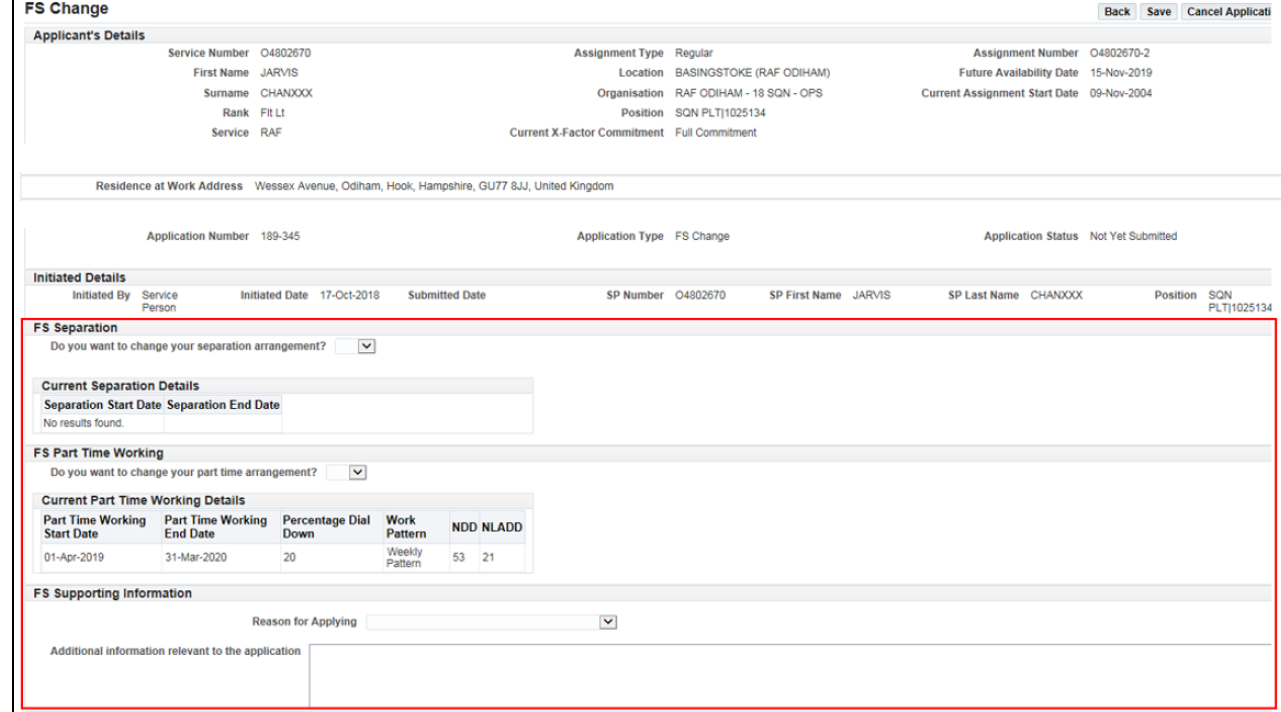
- changes can be made to Restricted Separation or Part Time Working, or both
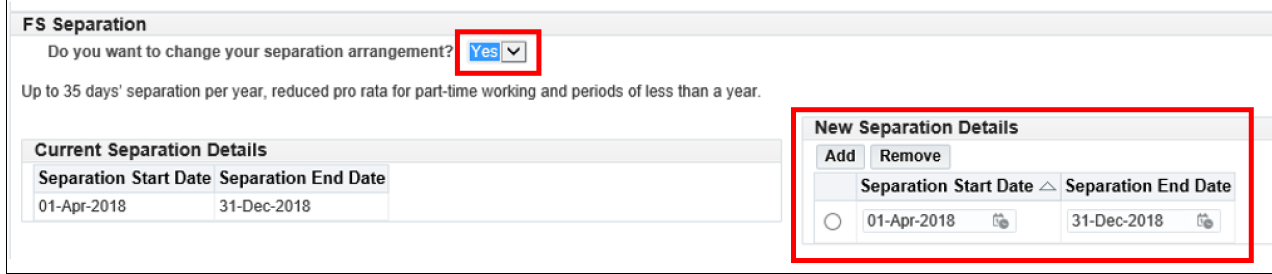
- first, you have the option to change the FS Separation details. Select Yes or No from the drop-down menu, whichever applies

- if Yes is selected, the New Separation Details section is displayed next to the Current Separation Details. This gives the option to Add, Remove or Change the dates using the pop-up calendars
- you now have the option to change the FS Part Time Working details
- the Current Part Time Working details are displayed. Select Yes or No from the drop-down menu, whichever applies

- on selecting Yes, the New Part Time Working Details section will appear
- the new Part Time Working Start Date and Part Time Working End Date can be amended in the relevant fields using the pop-up calendars
- the Percentage Dial Down and the Work Pattern can be amended as required
- once the required amendments have been entered, click Calculate. The system will recalculate the revised NDDs and NLADDs
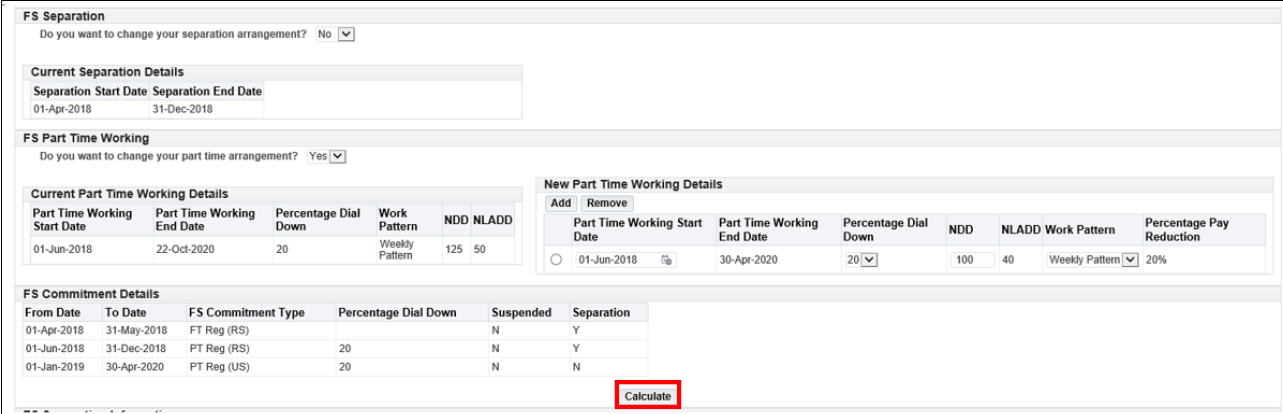
- the new proposed FS Commitment Details will also be displayed outlining the new periods of Restricted Separation (if any) and Part Time Working Details and the FS Commitment Type for each period
- complete the FS Supporting Information selecting the Reason for Applying from the drop-down list
- add any further supporting information in the free text box
- enter Yes or No from the Future Assignment drop-down box
- note: The Total Approved FS Balance and FS Arrangement History sections retain the details of the current FS Arrangement as the change(s) have not yet been approved
- once the information has been added, tick to agree to the terms and conditions, then click the Next button
- note: any warning messages will appear at the top of the screen
- click Submit to send the FS Change request for processing. This will send a workflow notification to the next actor in the COC, the Unit HR Admin

- a confirmation message will be displayed at the top of the screen

- logon to JPA, a Workflow Notification similar to the example below will appear, informing you that your FS Application has been sent back with an Alternative Offer. The FS Arrangement details in the Alternative Offer will be different to the details you requested in your original FS Application
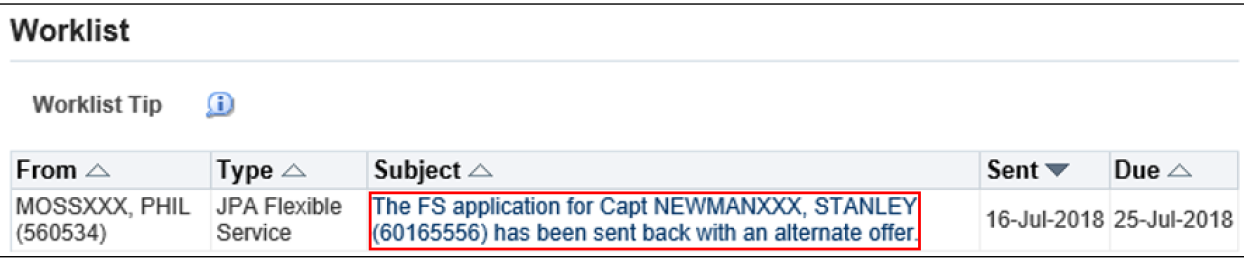
- click the Workflow Notification to access details of the original requested FS Arrangement as well as details of the Alternative Offer provided by the Career Manager
- the following screen will appear (2 screenshots denote the full screen):
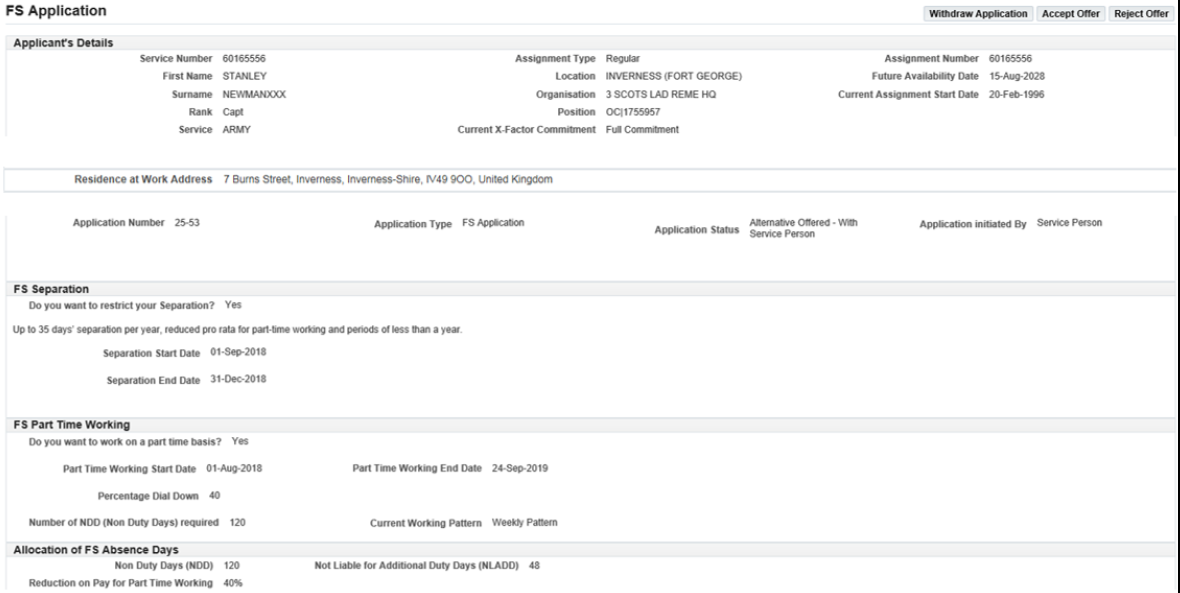
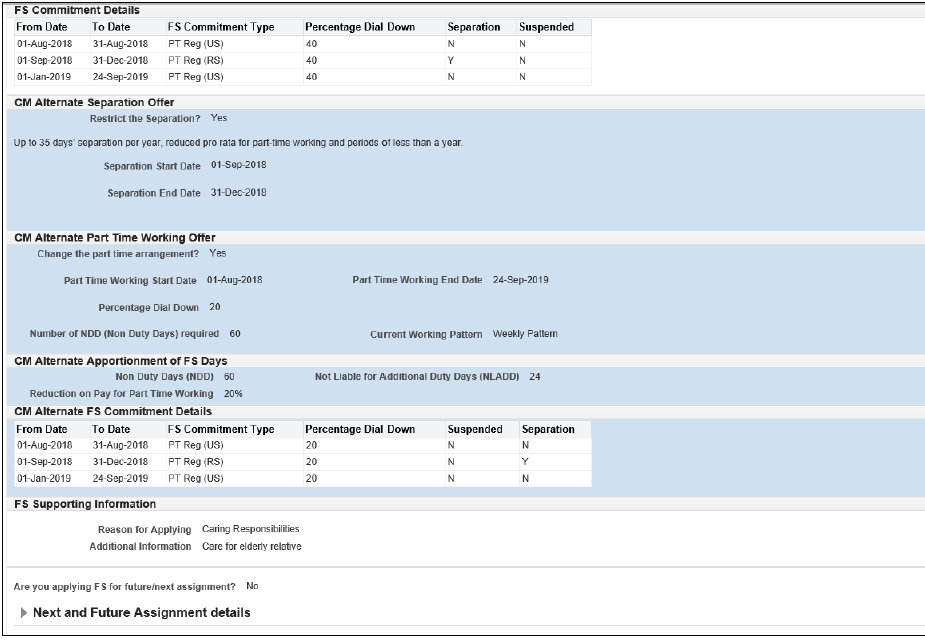
- details of the Alternative Offer are highlighted above in blue. In this example, the Alternative Offer is a dial down of 20% instead of the originally requested 40%
- note that the NDD and NLADD balances will be different to those in the original application if it relates to PTW
- review the offer and decide which option to select: Withdraw Application, Accept Offer or Reject Offer as appropriate

- clicking the Withdraw Application button will withdraw the FS Application from the system and no FS Arrangement will be in place
- if you are dissatisfied with the Alternative Offer, click the Reject Offer button, which will take you to the FS Appeal process
- note: If you wish to lodge a FS Appeal, follow the process as described here
- if clicking Accept Offer, the following screen will appear:

- a notification will be sent to all parties in the COC informing them that the Alternative Offer has been accepted. An example of the notification is shown below
A request to terminate an approved FS Arrangement can be made prior to, or at any date within the approved dates of a FS Arrangement.
- logon to JPA and navigate to PA Self Service - Employee, Armed Forces > Flexible Service

- select the radio button of the approved FS Arrangement
- click View FS

- the Flexible Service Details screen will appear, with the Approved Arrangement Details shown
- select the radio button of the FS Arrangement to be terminated and click the Terminate Arrangement tab
- the FS Termination screen will appear:
- select the appropriate Reason for Termination of FS Arrangement from the drop-down menu
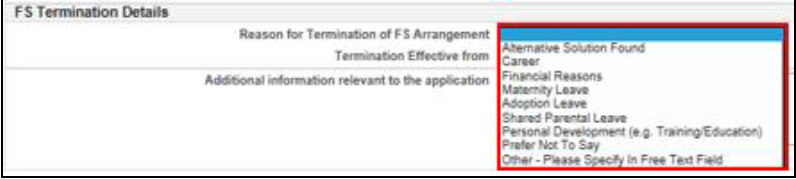
- populate the Termination Effective from date using the pop-up calendar
- note that the Termination Effective from date must be within the dates of the FS Arrangement being terminated
- enter any relevant information in the Additional Information free text box

- when ready to submit, click Next

- review the form and once satisfied click the Submit button to send the termination for processing
- a Workflow Notification will be sent to the next actor in the Chain of Command, your Unit HR Admin
- you will receive a confirmation message informing you the FS Termination has been successfully submitted to Unit HR for processing

You can submit an appeal following a Flexible Service (FS) application that has not been approved or an alternative offer that you have rejected.
Note: A FS appeal may be lodged when a FS application has not been approved (Rejected) or an alternative offer has been made and which you have rejected. The process of FS appeal is the same for both.
In this example, the appeal is against a FS application that has been rejected.
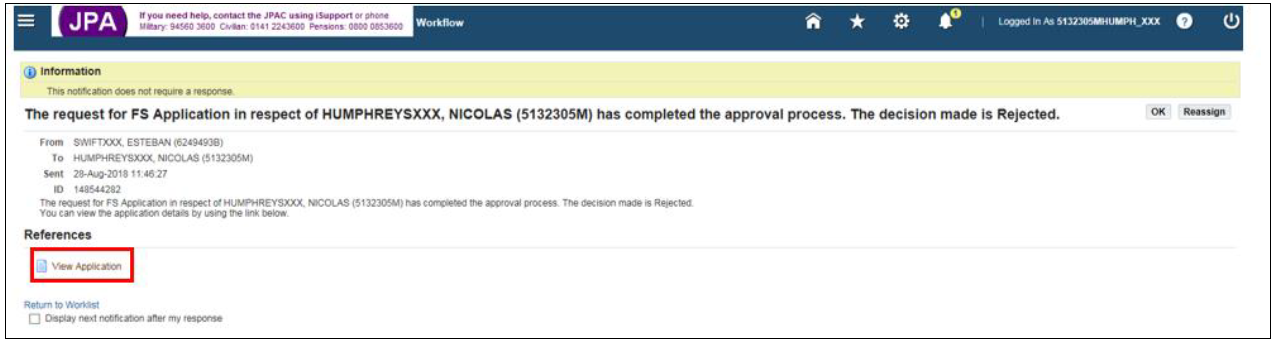
- logon to JPA, the following screen appears with a workflow notification showing that a FS Application has been Rejected
- open the Workflow Notification
- note that if there is no Workflow Notification for example if you previously closed the Workflow Notification, and you wish to appeal, navigate:
- JPA Self Service – Employee, Armed Forces > Flexible Service
- select the radio button of the rejected FS Application and click View FS
- the Flexible Service Details screen will open. Select the radio button of the rejected application and click View Application
- the FS Application screen will appear. Click Appeal and the FS Appeal screen will appear
- follow steps later in this task from the point of the FS Appeal screen to submit the Appeal
- on opening the Workflow Notification the Worklist screen will appear:
- tick the check box relating to the Rejected FS Application and click Open

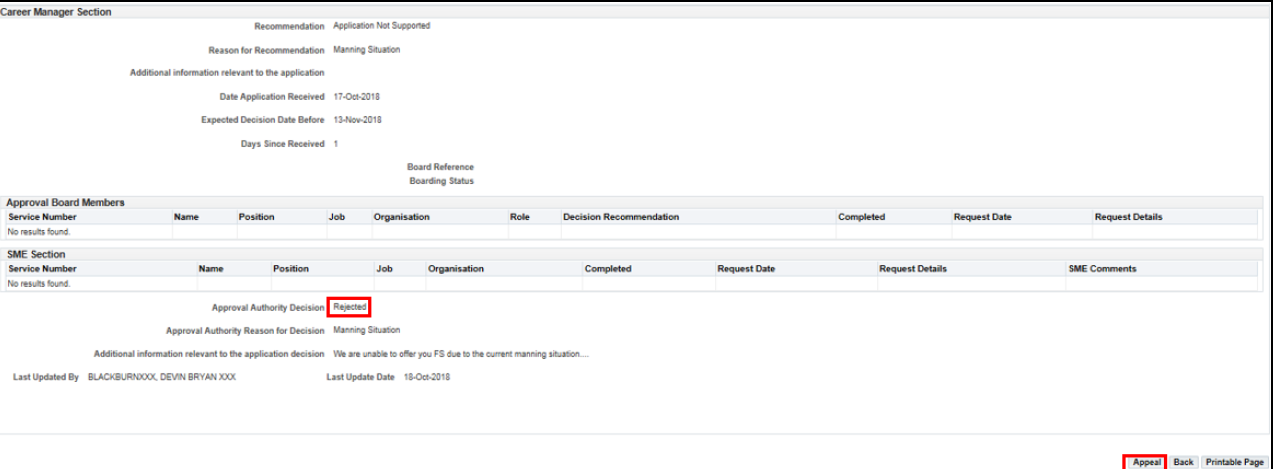
- the following screen will appear. Click View Application
- the full details of the FS Application will then appear, showing the decisions and comments made by all actors in the FS Application administrative chain. In the screenshot below, only the Career Manager section is shown, along with the Appeal and Printable Page buttons
- note the Approval Authority Decision of Rejected
- click Appeal to open the first appeal screen
- the FS Appeal screen will appear
- note the Appealed Application Type. In this example, the appeal is against a FS Application
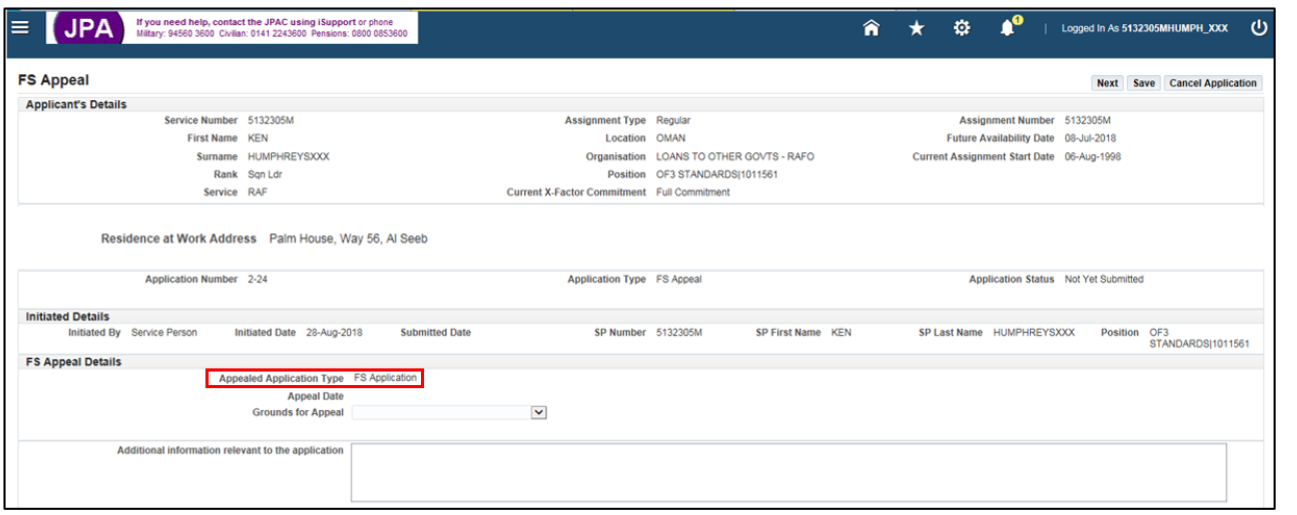
- the Appeal Date will be populated once the FS Appeal has been submitted
- select the Grounds for Appeal from the drop-down list, whichever applies
- add any relevant information in the free text box

- click Next to progress the FS Appeal to the next stage, or Save or Cancel as appropriate
- the FS Appeal review screen will appear
- click to Submit the FS Appeal

- once submitted the Appeal Date will be populated with the date of submission
- a message will confirm successful submission of the FS Appeal along with any warnings if applicable

- workflow Notifications will be sent to all actors involved in the FS Appeal process
- the outcome of the FS Appeal will be advised via a Workflow Notification once it has been determined