What you need to know
Get You home (Seagoers) allowance is designed to reduce the amount of time Service personnel are separated from their close family and friends when they’re assigned to a seagoing ship. You can claim it when your ship is docked in a UK port and you go to visit your loved ones.
It is important that you have read and understood JSP 752 Tri-Service Regulations for Expenses and Allowances (chapter 7, section 2) before proceeding.
It can be used to cover the cost of up to 10 journeys to visit close family or friends living at a UK address. You can also choose to transfer 6 of your 10 journeys to your immediate family so that they can come and visit you.
You can travel by public transport (such as by train or bus), by air or in your own private car or motorbike. Where journeys are undertaken by train or ferry you will be issued with a standard class ticket. Where journeys are undertaken by any other means you will be reimbursed up to the cost of Motor Mileage Allowance for the journey.
To claim this allowance you must be on a permanent assignment in a Seagoing Longer Separation Allowance Qualifying Unit (SLQU) or be serving on a temporary assignment for a period of 36 consecutive days or more in a SLQU.
A SLQU is a seagoing vessel which has a standard operating pattern requiring it to operate away from its Base Port. Your Unit HR Admin Office or Unit Personnel Office can advise you on this.
You won’t be able to claim this benefit if you receive Concessionary Travel for Immediate Families.
What you need to do
- Apply for authority to travel - You should apply for authority to travel on JPA to generate an authorised journey number. To do this:
- logon to JPA
- click JPA Self Service - Employee, Armed Forces
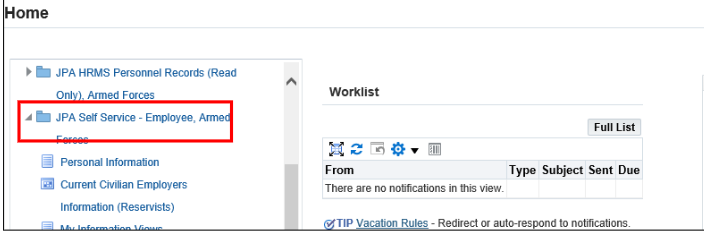
- click JPA Journey Application Claim
- click Self Service Journey Claim
The Journey Application history will be displayed.
- click Balances to proceed to the Current Journey Balances
![]()
- select the appropriate journey type (you may only have 1 option showing) and press Continue
- select Persons Travelling by clicking the Select box next to their name
- click Continue
- use the drop-down menus to select Outbound/ Inbound leg
- use the drop-down menus to select Method of Travel e.g. air, bus, car, ferry, passenger in car, train
- use Add Journey Leg to insert next stage of travel
JPA cannot process half journeys (one way only), therefore when a half warrant (one way only) has been used you should contact your Unit HR Admin who can adjust your balance accordingly.
Where GYH(O) entitlement is to be split over 2 journeys on occasions when the Service Person is unable to accompany family members to the UK (for Service reasons) and provided travel is to the same qualifying address you should contact your Unit HR Admin who can adjust your balance accordingly.
Manually submitted claims or claims for GYH (EY)(OA) must also be adjusted manually by the Unit HR Admin − JSP 752 Part 2 Chapters 5 & 6 refers.
- click Continue when all legs complete
You will now see a review of your journey application.
- note down the Journey Number
When the journey application is approved the journey number will be required to make your claim using JPA iExpenses
- click Continue to submit your journey application
You will see a Confirmation page, again showing your Journey Number.
- click Exit to close the screen
If you have forgotten to note the Journey Claim details or would like an update on your request, go back into Self Service Journey Claim where this screen will show your Journey Number and current Status.
2. Get tickets and make journey arrangements - If travelling by rail or ferry, speak to your Unit HR Admin or Personnel Office or travel centre to arrange tickets. For travel by any other means, you should make the journey arrangements yourself. Ensure you retain all receipts as proof of your journey.
3. Submit retrospective claim -
For journeys undertaken by other means or if you have been unable to get a Service provided ticket, a retrospective claim should be submitted via JPA using the journey number provided during the application process. To do this:
- logon to JPA
- select JPA Expenses
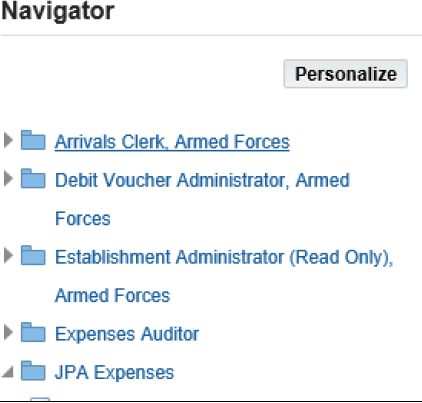
- click Create New Expense Claim
- complete the General Information screen
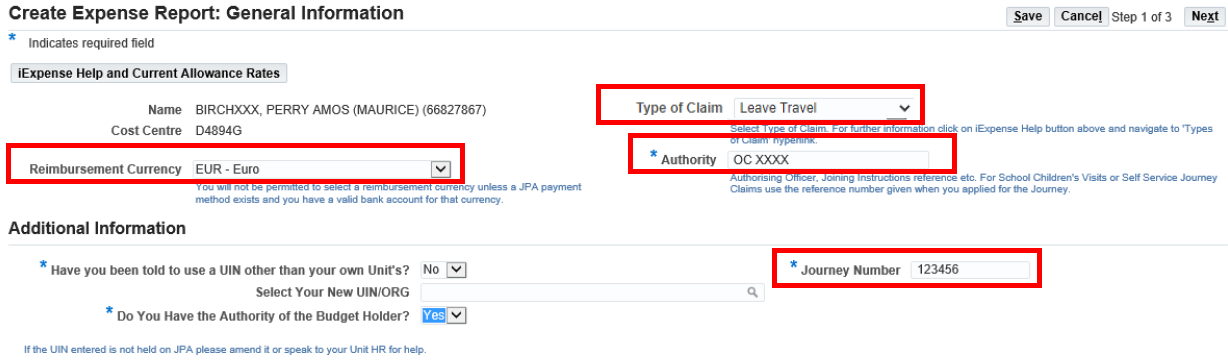
- select the correct currency from the drop down list in Reimbursement Currency field
- this field defaults to GBP – Pound Sterling e.g. EUR-Euros
- you will not be permitted to select a reimbursement currency unless you have a valid bank account for that currency
- select Leave Travel from the Type of Claim list of values (LOV)
- enter the approved Journey Number as the Authority for the claim
- in the Additional Information section enter:
- the approved Journey Number in the Journey Number box
- you may have to scroll to the right to view this box on the page
- you must use an approved Journey Number to submit your claim. The Journey Number is created when you apply for a Self Service Journey on JPA (as above). If you have no access to JPA your Unit HR Admin will issue a locally created Journey Number. This will mean you will then need to submit a JPA Form F016 as JPA will not recognise the locally issued Journey Number
- do you need to change your unit identity number (UIN)?
- select Yes from LOV in Have you been told to use a UIN other than your own Units? field
- select new UIN/ORG from LOV in Select Your New UIN/ORG field
- insert Yes or No in Do you have the Authority of the Budget Holder field
- click Next
The Cash and Other Expenses: Details screen will be displayed.
- click Details
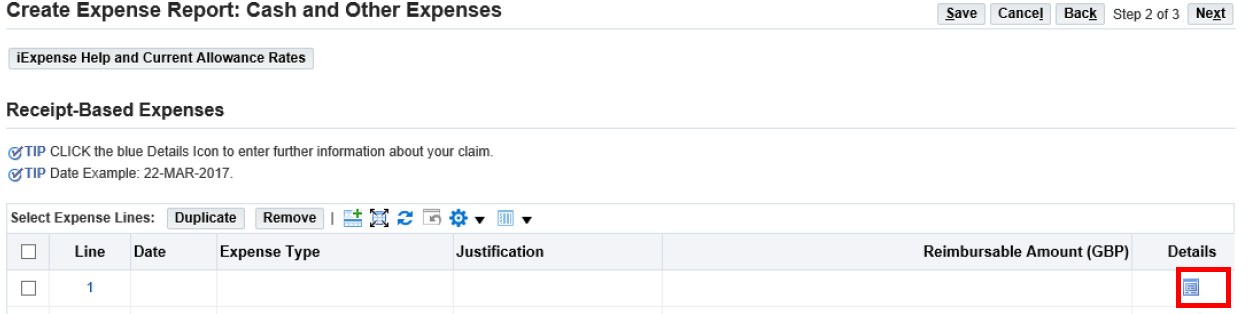
if claiming for Actuals Receipt Based Claims GYH(S) Bus fare/Eurostar/Eurotunnel/Ferry/Flight/Rail go to task #2 if claiming for MMA within UK go to task #3
2. GYH(S) Bus fare/Eurostar/Eurotunnel/Ferry/Flight/Rail

- select the appropriate Expense Type from the drop-down menu
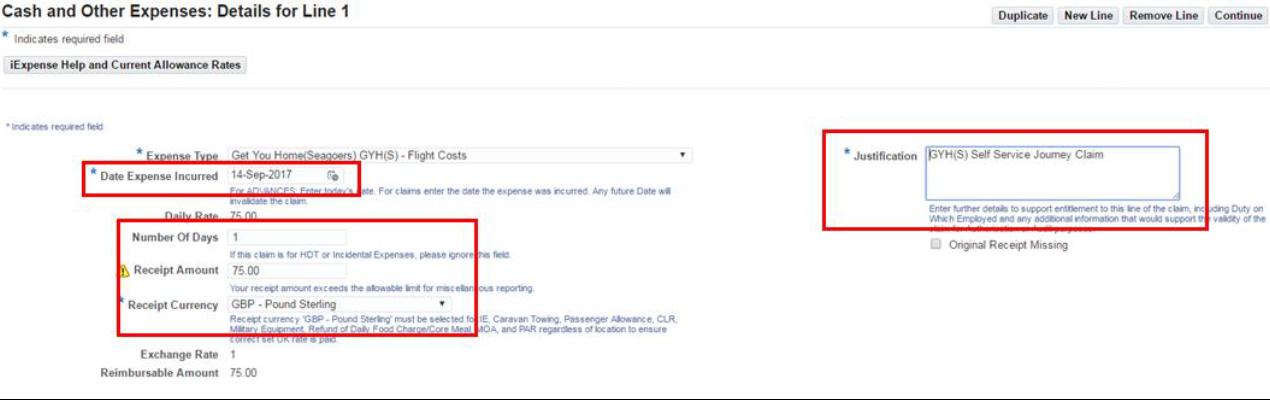
- enter Date Expense Incurred (if an Advance was given the Date Expense incurred must be the actual date of travel)
- enter Receipt Amount, if applicable
- enter the Receipt Currency as appropriate
- enter relevant information in the Justification box
- click Continue
3. To claim for MMA within UK

- select the Motor Mileage Allowance (MMA) from Expense Type the drop-down menu
- enter Date Expense Incurred - If an Advance was given the Date Expense incurred must be the actual date of travel
- enter any other relevant information in the Justification box
- enter the Receipt Currency as appropriate
- complete the Additional Information section:
- MMA Journey Distance – enter journey distance on Date Expense Incurred
- Miles or Km - select from the drop-down list
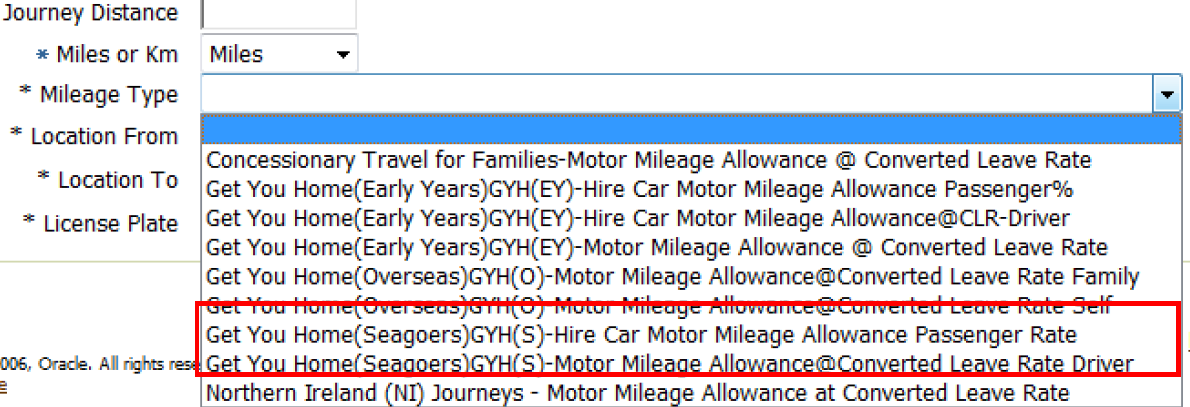
- Mileage Type - select from the drop-down list
- Location From – enter location from where journey started
- Location To – enter location where journey ended
- License Plate – enter vehicle registration details
- click Continue
- add additional lines as necessary by following the above steps
- a summary of your claim will be displayed
- you may Save or Cancel your claim at this point by clicking the appropriate button, or make amendments by clicking on the Details icon
- click Next
The Expense Report Review screen will be displayed.
- check the details and if you are happy click Save, otherwise click on Back to amend the claim
- click the I accept the Terms & Conditions box
- click Submit
If you don’t have access to JPA then you get the approval of your Unit HR Admin before completing JPA Form 016 selecting one of the Expense Types 45-53 and XXX Type of Claim and submitting to them.
If you have a Defence Gateway account you can submit expenses from your own personal device on the MyExpenses app (part of the My Series).